DIY Mason Jar Pendants
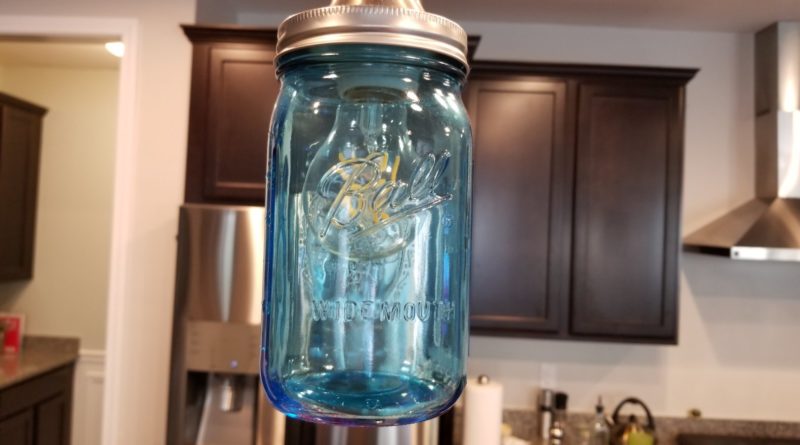
We built our new house but, somehow, the pendant lights over the island do not make it into the final home. We had a single light fixture in the middle of the island with a sad little bulb in the middle. It turns out that we had not actually paid for the pendant light (though we thought we did…this builder and the build process was a nightmare!), so we had to do something about. I smelled opportunity and wanted to do non-traditional pendant setup. We loved the idea of using simple colored mason jars on a simple pendant fixture. I looked through other online how-to’s and was just not a fan of what I was seeing. The designs were either needlessly complicated or didn’t look “clean” enough to hang in a modern kitchen. We were also not loving the idea of the light hanging off of a wire, opting instead to look for a solid rod. After much looking, we purchased the pendant holders off-the-shelf (see materials below), and the jars and “Edison Style” led bulbs from Amazon.
STEP 1: WIRING
Disclaimer: I highly recommend hiring an electrician if you are at all uncomfortable messing with electricity. Seriously, don’t mess around with it. Also, my situation might be different from yours so use your best judgement on how to proceed. I detail my struggles in the hopes that it helps someone else.
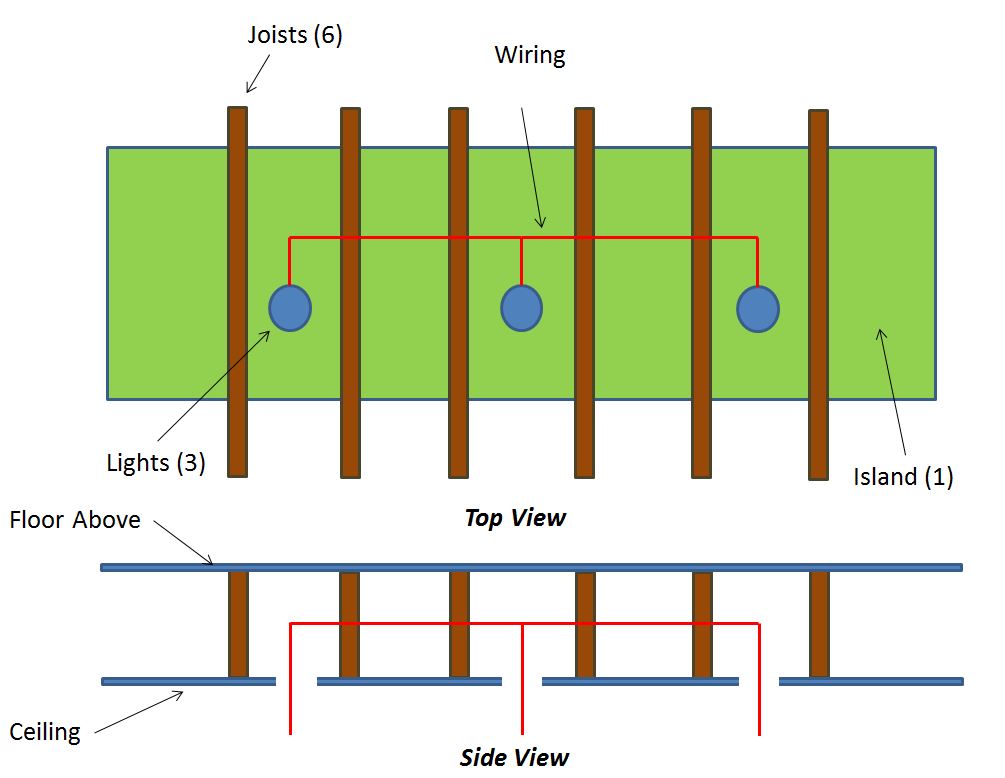
So, my joists run perpendicular to to the direction I need to run the pendant light and I do not have access from above (there is a finished room above the kitchen). To make matters works, my joist are 16″ apart (“on center”) and my pendant spacing was 32″ apart. This means that I would need to somehow reach up through a hole no bigger than a standard light fixture and drill a hole through one joist. I would then need to reach up through another fixture hole and drill a hole into the other joint. Then, somehow, pull electrical cable through the joist holes. I know the professional electricians among us do this all the time, but I had to scratch my head a bit to figure out a solution that did not require an investment in highly specialized tools. I thought about avoiding the situation altogether and to just use a hallow beam instead, but I really didn’t think it would work for our vision.
Pressing on, I found out pretty quickly that I was not able to fit my drill and long bit through the hole. And, even if I could, I wouldn’t be able to hold it firm enough to deal with all of the torque generated when drill a hole with a spade bit. So, I figured a (relatively) cheap specialized tool was needed. So I went to the store and bought a flexible drill bit with a little angled holder. The idea here is to keep the drill out of the hole and to push just the bit through. Drill one hole in the joist and then use the bending tool to pull the bit 90 degrees and aim, blind, for the second joist. Once through the second hole, tie your cable to the end of the bit and pull it through as you pull the bit back out. Easy does it! Problem Solved! Except, of course, nothing is that easy. In my (limited) experience, this just did not work at all. With this aggressive drill bit I was far more likely to drill a hole through the upstairs floor. It was very difficult to hold the pull the bit into a 90 degree position while balancing on a ladder. It did, however, drill a hole through one joist very easily. So, I went ahead and drilled holes from each of the fixture openings and through the joints it provided access to.
Now, the hole were drilled but I still needed to pull the cable. Luckily, an old wire hanger worked really well here. You are still hunting blind from to find one hole from the other, but it really wasn’t as bad as it sounds. Just keep poking until you find the hole. From there, tape the cable to the wire and pull it back through.

STEP 2: MODIFY THE LID
You need to cut a hole in the lid to so that you can pass the attach the lid to the pendant fixture. You end up “clamping” the lid to the bulb holder and then the jar screws into the lid. Cutting the hole can be accomplished in a number of ways. I just took the lid and screwed it to a board that was clamped to the table The screws were outside of the circle that I was going to cut. I then took a large diameter hole saw and cut the hole. The screw holes made excellent vents and the hole ended up being reasonably clean. I stressed about getting the hole perfect only to find out that it really doesn’t matter. Clamping on the bulb holder will hide most sins. If you don’t have a hole saw then I would recommend using a nail and hammer put holes along the circle and then use tin snips or a pair of pliers to remove the hole. Again, this is a very forgiving operation. Just in case, though, buy extra mason jars!
If you really struggle with this step then you can buy mason jar lids online that are pre-cut. Just make sure the diameter works for you setup.

 A needlessly perfect pre-cut lid
STEP 3: ATTACH THE FIXTURE TO THE CEILING
Follow the directions that come with the pendant holder. This should be straight forward. I recommend have a friend hold the fixture while you make the electrical connections.

STEP 5: ADD THE BULB AND GLASS

STEP 6: ENJOY!


Materials
LED Dimmable Filament Edison Style Light Bulb
Blue Mason Jars
Pendant Light w/ Solid Down Rod
Tools Used


